Insatiable Insight
Just remember, no one build / guide is going to be perfect for every situation played by every person ever. If it doesn't work, try again. The idea of this guide is to help you make your own ideas. This guide was created to inspire you, not scold you about not being a pro :D I myself am a crazy-***-noob at this game, lol. Just do whatever works. So, always remember, your imagination is the only thing that will always be perfect. Good luck, and have fun!

Insane Introduction
Hallo! I'm Silver Seer723 in case you don't know me yet. I am a no-lifer when it comes to these things so feel free to do ... a lot of ... things ... Anyways, This is my take on a  Hecarim Guide for you, my dear readers/ladies/gentlemen/league players/babies/judges/servants/people/cats/dogs/elephants/aliens/others reading this guide to make fun of the no-lifers out there! (anyone else go ahead and leave) Before I get started on this, I want to make one thing very, VERY clear. (If this is not as clear as a freshly cleaned window I will *censor*) This guide is not your Bible. It is not your Torah. It is a website made by a random amazing dude to help YOU have moreFUN. (I know right; INSANE)(The cake is a lie.)

Special thanks to (as always) jhoijhoi for teaching me how to create designs such as these even if I'm still a newbie to them ^^ Before voting, be it a thumbs-up or two thumbs-down, please read at least most of the guide and try out some of the things explained here. Without further ado, ENJOY!
Special thanks to (as always) jhoijhoi for teaching me how to create designs such as these even if I'm still a newbie to them ^^ Before voting, be it a thumbs-up or two thumbs-down, please read at least most of the guide and try out some of the things explained here. Without further ado, ENJOY!
Professional Pros / Consequential Cons
Pros
+Able to Jungle Well +High mobility +Relatively High Damage for Being Tanky +Insane CC +Amazing at Farming | space | space |
Cons
-Low Damage Early Game -Needs Team's Cooperation -Hard to Master -Focused -Large Body Frame |
Ravaging Runes

| RUNES | |||||||||||||||


| RUNES | |||||||||||||||


| M A R K S | spa |
| spa | M A R K S |
| RUNES | |||||||||||||||
| S E A L S | spa |
| spa | S E A L S |
| RUNES | |||||||||||||||

| G L Y P H S | spa |
| spa | G L Y P H S |
| RUNES | |||||||||||||||

| Q U I N T S | spa |
| spa | Q U I N T S |
Stupendous Skill Sequence


You're going to want to max out
Tips and Tricks
- The CDR applies on minions as well, use this to get an edge before a fight
- When jungling, try to use this as the final blow to a jungle camp, this will allow the CDR to continue on in the next camp
- You can activate this during Devastating Charge for bonus damage (movement speed buff)
- Use this directly after Onslaught of Shadows for massive burst damage to a large area
You're going to want to max out
Tips and Tricks
- Spam this spell if possible, the healing power on it will add up over time
- Never enter a fight without it if at all possible
- Use this spell to really turn the tides on an enemy mid-fight
- NEVER under-estimate or over-estimate this ability, it does small damage and heals small amounts but the damage+heal combined is rather considerable
You're going to want to max out
Tips and Tricks
- Use this skill to get in position during fights
- Mostly used for utility however if possible use it for the extra damage on an enemy
- When returning to lane from base, use this to get back to lane faster (start at pool so mana loss is 0)
- The damage is based on DISTANCE TRAVELED not time spent in the speed boost
Tips and Tricks
- When using this try to aim so that you best benefit your teammates
- This can also be used as an escape, run with Devastating Charge then jump over a wall
- As with most ultimates, don't 'save it for the right moment' use it when applicable
Incredible Items

| spaceArmorspacespac spaceResistspacespace spaceHealthspacespace spaceDamagespacespa spaceAtk Spdspacespac |
Absolutely Armor Penetration

Armor Penetration and Armor Reduction are the statistics of a Champion which allows them to counter some or all of a target's armor. All champions have 0 base armor penetration but can increase it with items, runes, or abilities for a few champions.
Armor penetration and armor reduction are applied in the following order:
1. Percentage Armor Reduction ( Jarvan IV's
  Dragon Strike)
2. Flat Armor Reduction ( The Black Cleaver)
3. Flat Armor Penetration ( Greater Quintessence of Desolation)
4. Percentage Armor Penetration ( Last Whisper)
Read more on How Armour Reduction Works Here. Credit to Complexicate and LoL Wikipedia.
1. Percentage Armor Reduction (
2. Flat Armor Reduction (
3. Flat Armor Penetration (
4. Percentage Armor Penetration (
Read more on How Armour Reduction Works Here. Credit to Complexicate and LoL Wikipedia.
Generic Gameplay

As
Later in the game focus on either taking the tank or carry role and fulfill them for your team. Run into teamfights at the lead of the charge and use your ult to damage/fear as many enemies as possible. As long as you fulfill your role, which is initiator, as expected you will be a great asset to your team.
Jagged Jungle


- Wolves(help)
- Blue(leash/help)
- 'Hang Out' by Red Buff jungling
- Gank when opportunity comes
- Dragon whenever possible
- Gank as much as possible
I can't say much else really besides that jungling is insanely situational because it all depends on your lanes. If you follow that route like a Bible you'll fail horribly 9/10 times. You need to be flexible with your choices and actions. Don't go F*** YEAH PONY CHARGE! WOOHOO! BOOOOOOOOOMMM!!!!!!!!!!! unless you intend to basically fail that game and are just doing it for fun. (Believe me though it's hilarious,  Zilean+
 Nunu+
Nunu+ Sona+
Sona+ Sivir+ Hecarim=PONY CHARGE NUKE.) Anyways, off topic... Be flexible and help your lanes as needed or farm jungle as needed.
TL;DR: Start blue. Gank a lot. Get dragon as much as you can. Be flexible.
TL;DR: Start blue. Gank a lot. Get dragon as much as you can. Be flexible.
Whimsical Wards

Mowen wrote:
"For your warding section you should emphasize not to buy wards unless it's an absolute necessity (ie your team doesn't even ward dragon/baron) because really other characters should be buying those for you since you really need to farm farm farm."
I believe this is untrue. Everyone should buy wards. Vayne should buy wards, but not as often as the tank or the support on your lane. If you're solo top or solo mid, wards are definitely necessary unless you're completely pushed back to your allied turret.
Pro Tip: Whenever you recall or have died, and you find yourself in the shop, buy a
[*] If every player brought one ward each time they recalled, and assuming players recalled once every 7 minutes in a 35 minute game, your team would be rewarded map vision for the whole game (assuming your wards aren't taken out by an
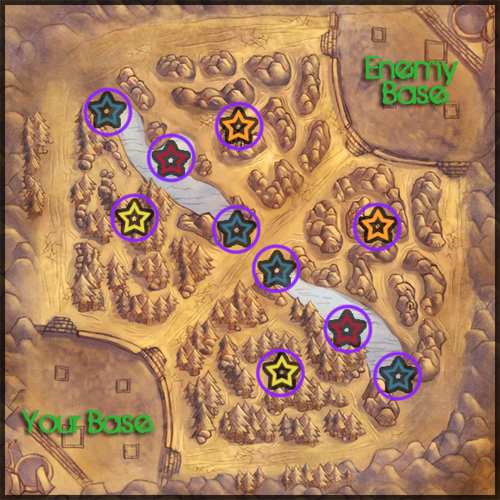
[*] If your team is co-operative in this endeavour, warding "The Belt" will prove highly effective. The Belt is shown below. In addition to standard warding of Baron/Dragon/Buffs, warding as shown below (assuming you are Purple - Top Team, reverse if you are Blue Team) will warn you of all enemy movement from their jungle.
This is where you and your team should Sight Ward beyond the places show in the above image. Keep in mind, you don't have to ward the whole map - try and spread out your wards so that they cover the most amount of area for the least amount of wards.
- Yellow: Vital to protect the jungler on your team
- Blue: For protection depending on which lane you're on
- Red: To guard Dragon and Baron
- Orange: In order to Counter-Jungle